Pages

Wednesday, April 17, 2019

Creating a Oracle VM virtual box - Windows Server 2012 R2 64bit

I have created an Oracle VM with Windows Server 2012 R2 64-bit as part of my installation of CRM 2013.

Listing down the steps that I have followed:
  • Download Oracle VM software from the link: Oracle VM download link
  • Since I have Windows 10 installed on my machine, I have downloaded the 64 bit version of software for Windows platform.
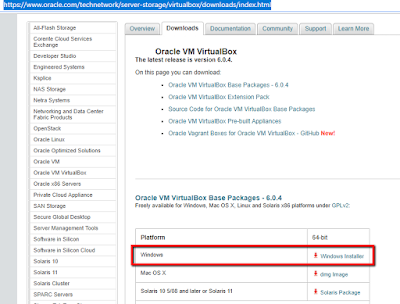
Oracle VM download page
Oracle VM virtual box download page


  • Once the software is installed, download evaluation version of Windows Server 2012 R2 64 from Microsoft website.     Windows Server 2012 R2 evalution version - download link                                                                   
  •  Note that HyperV and Intel Virtualization needs to be enabled in order to install a 64bit OS on a VM. Quick googling led me to this video and my problem got resolved. Enable 64bit option in Virtual box
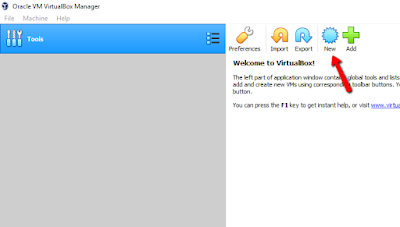
  • Open Oracle VM application and click on New.
    Creation of new VM
    Creating new Virtual machine in Oracle VM
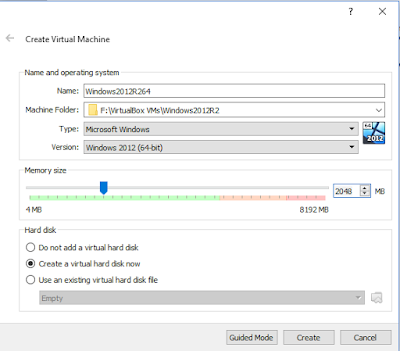
  • Provide necessary details and click on Create button. Select the option to create a virtual hard disk so that a vhd is created for you. 
    Basic settings for creating a new VM
    Creation of VM - basic settings
  • Provide necessary details for creating a virtual hard disk. I recommend to allocate 60GB or more as the applications for CRM 2013 would require a lot of space. Select the Virtual hard disk option and also select the option to allocate storage space dynamically. Dynamic allocation of storage space is helpful in case you need to increase the storage space in the future. 
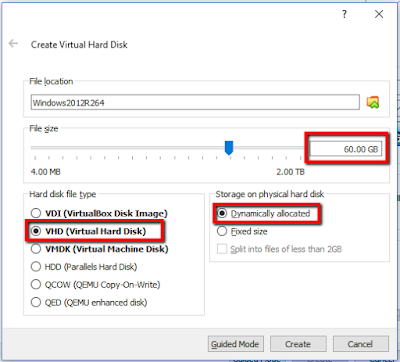
Settings for creating a VHD file
Creation of VHD file - settings

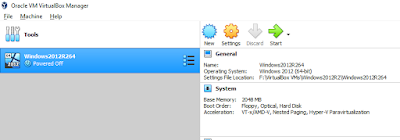
  • Once the VM is created, select the VM in Oracle VM interface and click on Start.

    Starting the VM
    Starting the created VM
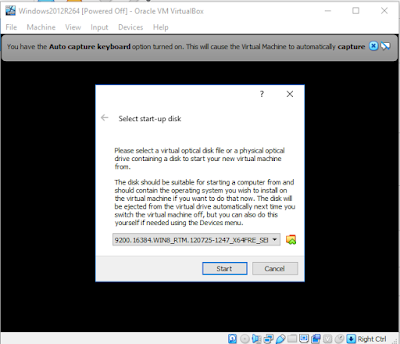
  • The user will be prompted to select a start up disk. Select the iso file for Windows Server 2012 R2.
Selecting start-up disk
Selection of start-up disk

  • Follow the installation steps to install Windows. I have selected the option to install server with GUI as I am more comfortable with GUI.
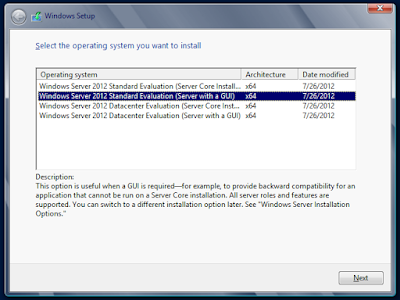
Select option with GUI
Selected option with GUI


This completes the installation of Windows Server. 👍

The next step is to enable sharing of folder between the host OS and the VM. This helps in copying files between the host OS and VM.

Here are the steps:
  • Under Devices menu click on "Insert Guest additions CD image"
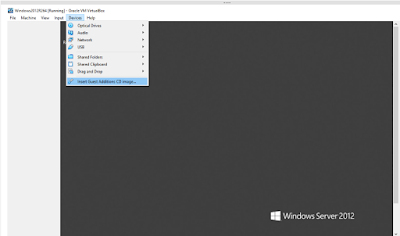
Insert Guest additions CD image
Insert Guest addtions CD image

  • This mounts the Guest additions CD image. Navigate to "Computer" you should be able to see the Guest additions image mounted.
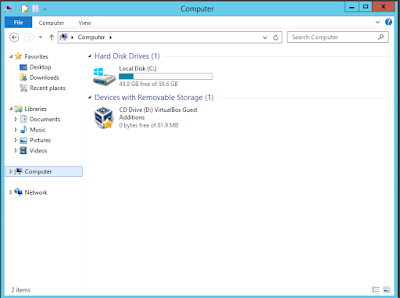
Guest additions CD mounted

  • Open the drive and run VBox Windows Additions file.
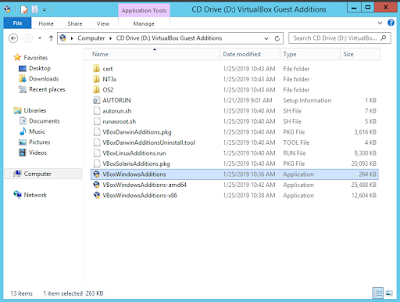
Running Guest additions installer


  • Follow the wizard to install Guest additions on the VM. Allow the VM to reboot once the installation is complete.
  • Its now time to configure a shared folder so that files can shared between the host OS and VM.
  • Under Devices menu, select Shared folder settings.
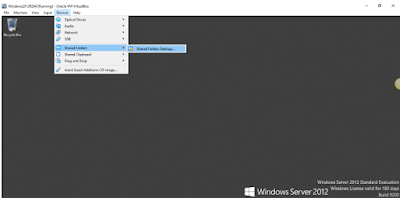
Shared folder settings
  • Select  "Machine Folders" and click on the Add sign.
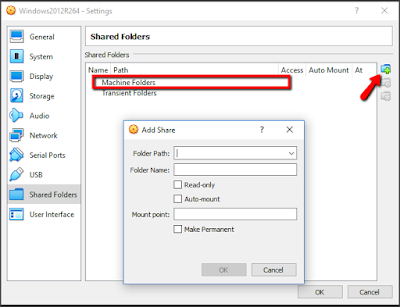
Adding a machine folder

  • The folder path text box lists out the folder structure on the host machine. Select one folder which you want to share with the VM.
  • Check the Auto mount checkbox to enable mounting of the shared folder every time the VM is started.
  • Check the "Make permanent" check box in case you want to save the setting permanently.
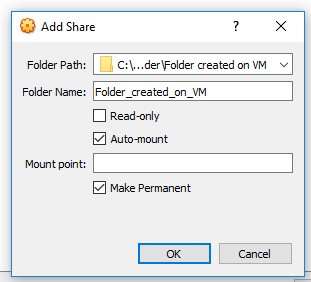
Settings for shared folder


Wednesday, October 25, 2017

Solved: "No such interface supported" error when a Visual studio solution is opened


  • "No such interface supported"
  • "This project is under source control. This version of Visual Studio .NET does not support source controlled projects. Any changes that you make to this project will not be propagated to source control."

Visual studio 2012 throws an error "No such interface supported" when any of the following actions are performed:

  • Open Source control explorer from within Visual studio.
  • Open a solution bound to Source control
  • Add a solution to Source control.

In addition to this error message, when a solution bound to source control is opened, an error message "This project is under source control. This version of Visual Studio .NET does not support source controlled projects. Any changes that you make to this project will not be propagated to source control." pops up and the projects fail to load.

One of the reasons for this issue is that the config file "VersionControl.config" present in "C:\Users\YourName\AppData\Local\Microsoft\Team Foundation\4.0\Cache\" folder got corrupted.

In order to resolve this issue, close Visual studio, navigate to the folder and delete the config file. Start Visual studio and source control should work as expected.


Monday, April 24, 2017

Check public key token for a dll using powershell

Public key token for a dll can be checked using a simple command in PowerShell.

Open Windows PowerShell window.
Run the command "[system.reflection.assembly]::loadFile("DllPath").FullName

powershell command


Sunday, April 16, 2017

How to determine if a dll is built for 32-bit, 64bit or Any CPU

CorFlags.exe is part of the .NET Framework SDK. I have the development tools on my machine, and the simplest way for me determine whether a DLL is 32-bit only is to:

  • Open the Visual Studio Command Prompt (In Windows: menu Start/Programs/Microsoft Visual Studio/Visual Studio Tools/Visual Studio 2008 Command Prompt)
  • CD to the directory containing the DLL in question
  • Run corflags like this: corflags MyAssembly.dll
You will get output something like this:


   Microsoft (R) .NET Framework CorFlags Conversion Tool.  Version  3.5.21022.8
Copyright (c) Microsoft Corporation.  All rights reserved.
Version   : v2.0.50727
CLR Header: 2.5
PE        : PE32CorFlags  : 3
ILONLY    : 1
32BIT     : 1
Signed    : 0
The key is the "32BIT" flag as documented above: 1 = x86; 0 = Any CPU.
For x64 only the output would be (plus after 32): PE: PE32+

How to read connection string

 string connectionString = ConfigurationManager.ConnectionStrings[connectionName].ConnectionString;  

Make sure to add reference to System.configuration in your project.

Wednesday, April 12, 2017

How to open a file locked by other process

Trying to open a file which is being used by another process will result in an exception.

For example, when we try to open a word document opened and locked by other process, we will get an exception.

Here is the sample code that results in exception:
 using (FileStream fs = new FileStream(fileToUpload, FileMode.Open, FileAccess.Read))  
 {  
  fileContents = new Byte[fs.Length];  
  fs.Read(fileContents, 0, Convert.ToInt32(fs.Length));  
 }  

Inorder to resolve this,

we need to use another overload of the FileStream constructor.

Just add FileShare.ReadWrite to the parameters.
 using (FileStream fs = new FileStream(fileToUpload, FileMode.Open, FileAccess.Read, FileShare.ReadWrite))  
 {  
 fileContents = new Byte[fs.Length];  
 fs.Read(fileContents, 0, Convert.ToInt32(fs.Length));  
 }  
This overload of the FileStream constructor allows to open a file in a non-exclusive mode.

Thursday, April 6, 2017

Error: A table, Extended Data Type, Base Enum or class called {TableName} already exists. Import of table aborted.

Sometimes during import of an xpo file, we might encounter the following error:

A table, Extended Data Type, Base Enum or class called {TableName} already exists. Import of table aborted.

This errors is a critical error and it stops the import of xpo.

REASON: In majority of cases this error is due to caching.

FIX: In order to resolve this, clear all cache files - .AUC files from the users AppData folder.

  • Close AX 2012 client
  • Browse to the folder "C:\Users\{userName}\AppData\Local (Windows 2012 Server)
  • Delete all AUC files
  • Start AX 2012 client and start import.

#Happy coding :)